Showing posts with label healthy. Show all posts

Thursday, 12 November 2015

Quick Toddler's Chow Mien!


I love preparing for my son’s meals. Especially now that he is over a year old, I can easily give and share “our food” to him with very minimal alteration from the recipe I use. I still watch out for the salt and sugar. If I make his meals, I don’t add any salt or sugar to it. But if it is store-bought, I try to find something that has a very minimal amount of salt/sugar in it.


One of my son’s favorite snacks is noodles. I am not sure why, probably he liked the idea of eating something long. He has this funny habit of getting a single strand from his plate using his pincers and put the strand inside his mouth. He will gradually slurp it while saying “mmm mmm”. LOL! Kids! They are so easy to please (sometimes!).


I made some chow mien for myself and my husband the other night so I separated some of the veggies to cook for my son’s noodles. I did not put any seasoning to my son’s veggies except for a bit of ground pepper to taste.

My son's favorite chow mien!
Recipe:

1 portion of uncooked egg noodles
a handful of mixed veggies (I used beansprouts, cabbage, and carrot for this) sliced thinly
ground pepper to taste
1 tsp sesame oil

Steps:

1. Boil some water and soak the noodles in it (if using dried noodles)
2. Heat your pan and place the sesame oil
3. Saute the vegetables for about 2 minutes or until it becomes soft
4. Strain the noodles and toss in the same pan with the vegetables
5. Stir fry for another 2 minutes or until the noodles and vegetables are well-cooked
6. Serve warm and enjoy!

Note: These are the ingredients/items I used to create this dish

Sunday, 25 October 2015

Easy Salmon Fish Cake


I love preparing my son’s meals and snacks! I love spending time in the kitchen and really enjoy preparing my family’s meals. I make sure that my son gets to eat different types of meats and veggies per week to make sure he gets the proper nutrition his growing body needs.

My son is a very active toddler and in order to make sure that he gets all the calories he needs for the day, I offer him 3 meals and 2-3 snacks throughout the day. There are days when he can finish all the food I prepare for him with such gusto. However, there are “bad days” where he is not really interested in eating!

It can get quite frustrating for Moms who prepare food from scratch, only for it to end up getting binned. How much more for working Moms like me!? The answer to that is to make use of the oven and freezer!

I love preparing muffin-styled food for my son because it is easy and I only needed to make use of a 12 pieces muffin pan. It is very easy to come up with different flavors and tastes! I make at least 6 muffins of anything and keep 3 in the fridge. The remaining 3 pieces will be stored in the freezer for future use.

Since being quite busy with work and I realized it’s been a while since my son had fish, I decided to make him a salmon fish cake. Unlike the typical fish cake where frying is involved, I used my muffin pan so I just pop it in the oven and wait for 20 minutes.


Salmon Fish Cake
Salmon Fish Cake. I know my photo is horrible!

Recipe (makes 6 muffins/fish cake):


1 small fillet of salmon, cut into strips

1 sweet potato, roasted and cut into chunks
¼ sweet yellow bell pepper, roasted and cut into chunks
Black pepper to season
2 eggs
3 tbsp self-raising flour
Oil for brushing

Steps:
1. Preheat the oven to 170C.
2. Mix all the ingredients in a mixing bowl, except for the oil.
3. Once mixed, brush the muffin pan with a bit of oil to prevent the muffins from sticking.
4. Scoop the salmon mixture and place inside the muffin pan. Do not fill up to the brim. Leave a bit of space, maybe about 1cm.
5. Place inside the oven and cook for 20 minutes.
6. Serve warm and enjoy!

Note: Here are the ingredients/items I used to create this recipe:


Thursday, 15 October 2015

Gradual Weaning Process for Myself: Letting Go

I was blessed with a lot of milk and I always thank God for that. While our breastfeeding journey was not perfect, I can say that I am so happy that until this moment we are still breastfeeding. I am also thankful that my current work setup allowed me to breastfeed my son directly. It can also be the reason why we were able to breastfeed for this long.

Despite being at home most of the times, I always pumped milk in the morning for my son. Regardless if he will drink the milk, I made sure that I pumped on my “pumping time”. It was the 15-minute session every day, every morning that I allocated to pump milk. Since my son did not regularly use the milk stash stored in the fridge, I accumulated enough freezer stash for him that filled the last tray of our freezer. Probably if our freezer was any bigger, I could’ve stored a lot more than what we ended up with.

When we go out, that’s when the stash became useful to us. I never breastfed my son in public (unless it was during a long plane ride) so we had to bring a bottle for him. However, at around 16months, my son voluntarily weaned from the bottle. We noticed that if we were out, he can last the whole time without drinking milk but will continuously do so if we were at home. If we tried to offer him the milk from the bottle whilst outside, he will throw temper tantrums while looking at me. Probably his way of saying, “What is this Mom?!?! I want boobs, not THIS!” We tried putting the milk inside his sippy cup, mixing with cow’s milk, mixing with flavored milk ETC. But nothing will make him drink milk unless coming from me.

So we stopped to bring milk while we are out. And that left us with our full tray of frozen breast milk stash. I had a quick look at the dates and the milk was still usable. I contemplated what I wanted to do with it. I initially thought of giving it away, but I held back. Why? I was thinking/hoping that my son will still drink the milk. I never thought I would feel that way, but it occurred to me at the time that the pumped milk belonged to my son. I thought of the days I was so busy with work, but I can’t/don’t want to skip my pumping session fearing my son will never have enough milk.

A couple of days passed by, and one frozen bag expired. I still have about 2 Liters of milk sitting inside the freezer. That’s when I finally accepted that my son will no longer use it. It has been months since he drank milk from any other source except me. I finally accepted that in order for the days/time I spent pumping that milk mean something is for it to be useful.

I offered the milk for donation and it didn’t take long for somebody to accept it. I didn’t meet the lady whom my breast milk went to but knew that her little one had tongue tie so they had issues with latching. But she was really determined to breastfeed her son. I gladly gave the entire frozen milk stash and somehow I felt a tiny pinch inside my heart as I was emptying our freezer tray. I knew that the milk will end up with somebody who needs it, but it just made me realize that it could be a sign; the start of my son’s weaning process. And it hurts me just by thinking about it.

After the milk exchange, I received a text from the lady thanking me. We exchanged a few more texts until I received this. With that, I just knew that giving the milk to somebody who will use it was the right decision. It could be the best way for me to gradually start our weaning process, letting go of our freezer stash.

Thursday, 3 September 2015

Tips When You Need to Buy Readymade Snacks


As mentioned in my previous post, there are times that I can’t prepare my son’s meals. Just like any other working moms out there, I don’t always have the time to do everything! As much as I want to keep everything homemade, there are times when it is impossible. So I do the next best thing for me: buy store-bought snacks. It is better than to allow my son to go hungry, right?
However, I just don’t buy snacks just because that’s what other kids eat or because that’s what I used to eat when I was little. To choose ready-made snacks, here are some things moms can keep in mind in choosing what to put in the grocery basket and what I do before handing over for kids to eat:
  • Avoid overly sweet or salty food. Even your local public health nurse recommends not giving salty and sweet food to your little one (until the age of 3). Small children’s internal organs are not ready to process huge amount of salt and sugar in their teeny-tiny bodies. Studies show that what we eat when we were little has an impact on our food choices later in life. Avoid cream-biscuits, wafers, or crisps when buying ready-made snacks for your kids.
  • Don’t fall for the organic labels, read the ingredients. Moms these days are easily drawn into the organic food labels, thinking that organic meant healthy. While it could be true for some brands, not all food labeled as organic are healthy. So when shopping for ready-made snacks, make sure to read the ingredients list. If there are anything in the list that you are not familiar with, it is more likely to be artificial.
 
Ingredients List of Kids Readymade snacks
Left vs Right: See the difference?

  • Check the expiration date. Make sure that the pack you bought is not yet expired or way in advance of the Best Before Date.
  • Taste it first before giving it to your kids. A lot of issues these days show that even the well-known brands falling culprit to negligence in food preparation. Moms reporting of molds inside a packet of flavored milk or fruit smoothie are rampant these days. Even if the packet indicate that the item is way before its Expiration or Best Before Date, it is better to take a few sips especially if you can’t see the contents before handing it over to your child. It is always better to go on the side of pre-caution than to get the risk of food poisoning.
  • Try to avoid flavored options. These usually applies to dairy products such as flavored milk and yogurt. Do you know how easy it is to add sweetness to these items naturally? My advice is to buy the plain ones because it allows you to cut the sugar amount drastically! Buy plain fresh milk or plain Greek yogurt for your kids. To sweeten, you can easily add fresh fruits such as banana, berries, or cooked apples. I recommend to add a drop of maple syrup or honey (if your child is more than 12 months).

Note: I store a couple of packets of ready-made snacks in the cupboard to make sure my son has something ready for snacking on days I am unable to cook for him. If my first choice brand is not available, I try to buy the next best alternative. My goal is still to provide my son with healthier and homemade food choices. 

I also buy fresh fruits. Sliced fruits are a nice snack for little ones. Kids will particularly love eating some sliced apples, a banana, or plum as a snack. Snacks are meant to keep your kids from getting hungry as they wait for the next meal such as lunch or dinner. So it need not be too heavy to avoid losing appetite for the meals.

Friday, 21 August 2015

Healthy Crackers Recipe: Parmesan and Oregano


My son loves to eat crackers or anything crunchy as a snack. He would eat the usual food I prepare for him but would eat crackers with so much gusto; it’s as if he is eating a steak! Probably if he can only have his way, he would always eat crackers. Whenever I give him a piece, it will never end up on the floor or in his hair! He will finish the entire thing with a big grin on his face!

I also love to eat crackers especially if I can have a bit of cheese or dip in it. But we all know that it is not that healthy. Some crackers are too salty and it is difficult to feel full by eating only a few pieces. Because of this, I try my best to make my son’s crackers at home. It is actually very simple and easy to make! The downside to it is that because I don’t put additives, I need to throw leftovers (if any) after 1-2weeks.

Recently, I also discovered that my son loves cheese. When I first introduced him to cheese, I was buying the Mini Babybel Cheese or the stretchy cheese. He didn’t like them (but I do! LOL) and would spit it out the moment he tasted it. I stopped trying to give him cheese for snacks until I bought some grated red cheddar and mozzarella. I tried to give him just a few strands to taste and was surprised to see him eating it and asking for more!

I have made these crackers before for my son and made it again since he likes them so much! Try it and hope your little one would love it too!

Healthy Crackers Recipe
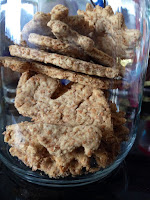
Healthy Parmesan and Oregano Crackers!


Recipe:
1 cup wholemeal flour
1 cup plain flour
¼ cup grated parmesan
5 tbsp dried oregano
¼ cup oil (I used olive oil for this)
About ½ cup water

Note: If you don’t like the grainy texture wholemeal flour has, you can make the crackers by using just plain flour.


1. Mix all the ingredients together except for the water. Combine the ingredients by hand. You should have a sand-ish consistency.

2. Gradually add the water while kneading. Keep on adding the water until you are able to form a dough ball.

3. Once your ingredients are solidly formed in a ball, try to roll it to your desired thickness. Note that the thinner you roll the dough, the easier it is to make it crispy!

4. Pre-heat your oven to 175C.

5. Continue rolling the dough and mold the crackers to your desired shape. Use cookie cutters if you like!

6. Cook the crackers for 10 minutes. After 10 minutes, take it out of the oven and flip to the other side.

7. Put it back inside the oven to cook for an additional 10 minutes.

8. Let it cool before storing in an airtight container.

Additional Note: I have been making these crackers a while now and learned it is best to store the excess dough in the freezer :) My son can easily finish just 1 tray in a week so I prefer to bake frequently to make sure he is eating freshly baked crackers.

Note: Here are the ingredients/items I used to create this recipe:

Friday, 7 August 2015

Healthy Vegetable Pasta


My 18 month old son loves pasta. He can eat it even if it is just the plain, boiled pasta! It doesn’t matter if it is fussilli, penne or spaghetti. Just hand him a piece and he will gladly finish it; as if it was a bag of crisps!


It is good he loves pasta because I also love Italian food. But I don’t want him to just eat pasta all the time. I want him to get used to different food textures and tastes. I know of kids who are allowed to eat plain, boiled pasta all the time and wondering where they get the nutrition their body needs. 


Since I am a working mom, finding the time to cook different variety of food can be troublesome. So what I do is to cook enough for about 2-3 serves. I make sure my son finish the food in a week to make sure it is still fresh, especially if it is tomato-based.


For this recipe, I used easy cook fussilli so it cuts my cooking time in half! What I did to save time is to cook pasta for dinner and made sure there were some leftovers that my son can eat as snack after his first nap. It is hitting two birds with one stone!


Vegetable Pasta Recipe
Yummy Vegetable Pasta


Recipe:


Handful of easy cook fussilli

Handful of chopped zucchini

Handful of chopped baby tomatoes

A bit of water

1 inch leek, chopped

Pepper to taste

1 tbsp Olive oil


Note: I still don’t add salt to my son’s food when I cook it separately. What I do is I let him have a taste of our usual adult food from time to time.

1. Boil the fussilli in advance and drain. Set aside.

2. Place the pan over medium heat and put the olive oil. Let it warm a bit before adding the leeks.

3. Toss the leeks a bit and put the chopped tomatoes. Toss until the tomatoes become soupy before adding the zucchini.

4. Add some water just enough to cover the zucchini. Let it boil and wait for about 2minutes or until the vegetables are soft for your child to chew.

5. Toss in the cooked fussilli and stir. Remove from heat and set aside.

6. Let it cool and store in the fridge immediately. This is good for the next 2-3 days for lunch or afternoon snack!


Note: Here are the ingredients/items I used to create this recipe: